Clownfish is one of the most popular voice-translating applications at the moment. However, some users often face issues while using the application. In this guide, we will share how to fix the voice changer not working issue.
How to Solve The ‘Clownfish Voice Changer Not Working’ Issue
If you have encountered the ‘Clownfish voice changer not working’ issue, implement some solutions to get rid of it. In the following section, let’s find out how to solve the voice changer issue:
Method 1: Update Clownfish
If you face the Clownfish voice changer not working issue, check if the application is outdated. If it’s not updated, follow these steps to update Clownfish:
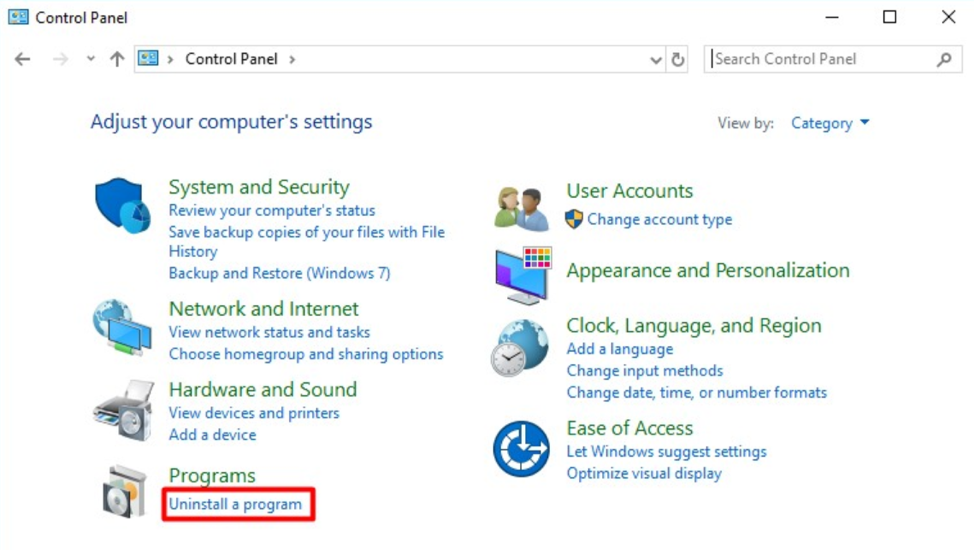
Step 1: Open the Control Panel from the Run window by pressing Windows + R keys.
Step 2: Next, type ‘control’ in the window and press Enter.
Step 3: Now, set the View by type as Category and click the Uninstall a program option from the Program section.

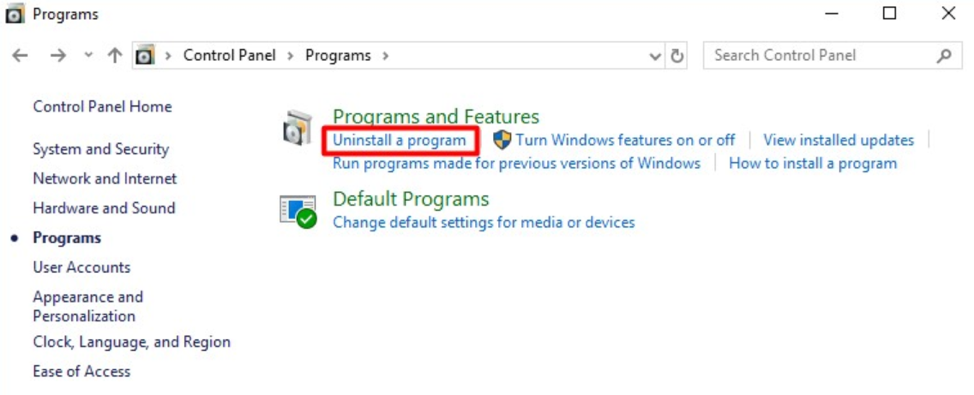
Step 4: A new window will appear. Here, you have to click on the Uninstall a program option.

Step 5: Right-click on the Clownfish Voice Changer option and click Uninstall.
Step 6: Once done, go to the official website and download the latest version. After that, restart your computer and check if the issue is solved.
Method 2: Install Clownfish in the Default Folder
You can encounter an error when the Clownfish application is not installed in the default folder. In that case, you have to reinstall Clownfish in the default folder. However, ensure you need to remove this application from the previous folder first.
Method 3: Check the Version of the Platform
Many users use Clownfish with Discord, Skype, or other applications. If your Clownfish application has the latest version but you are still facing the issue, follow these steps:
Step 1: Launch your Skype application and click on your profile picture.
Step 2: Once the new window is opened, click on the About this version option from the list.
Step 3: Here, you can get detailed information regarding the version. If needed, you can update to the latest version.
Method 4: Install Microphone in Clownfish
Another effective way to get rid of the ‘Clownfish voice changer not working’ issue is installing a microphone in this application. Keep reading the following section to learn how to install a microphone in Clownfish:
Step 1: Open Clownfish on your PC and right-click the Clownfish icon in the taskbar.
Step 2: Go to the Setup option and click on System Integration from the menu.
Step 3: As the new window appears, choose the microphone that is working normally and click Install to continue. The microphone will be installed automatically. Once done, reboot your computer and check if the error is gone.
Conclusion
Even though the ‘Clownfish voice changer not working’ issue isn’t that harmful, you can implement some solutions to get rid of it. If any of these methods aren’t working, reach out to the support team or seek help from an expert.
FAQs
There can be various reasons why your Clownfish application is not changing voice such as the application isn’t updated, the application isn’t installed in the default folder, or there’s an issue with the microphone.
You can solve the Clownfish voice changer not working issue by updating the application, installing a microphone, or installing the application in the default folder.
Yes, you can solve a microphone in Clownfish to resolve the voice changer not working issue.
